Swapnil Saurav

OSError errno22 invalid argument in Python

What is OSError?
OSError is the type of error in OSError : [errno22] invalid argument. OSError is an error class for the OS module. It is a built-in exception in python, which is raised. It is raised when the error occurs due to some system failure. I/O failures also give rise to OSErrors.

When the disk is full, or the file cannot be found, OSError is raised. The subclasses of OSError are BlockingIOError, ChildProcessError, ConnectionError, FileExistsError, FileNotFoundError, etc. OSError itself is derived from the EnvironmentError.

What is errorno22 invalid argument?
As the name suggests, invalid argument errors occur when an invalid argument is passed to a function. If a function was expecting an argument of a particular data type but instead received an argument of a different data type, it will throw an invalid argument error.

import tensorflow as tf
tf.reshape(1,2)

This code will raise invalid argument error. The tf.reshape() function was expecting a tensor as an argument. But instead, it received 1 and 2 as the argument.

‘OSError : [errno22] invalid argument’ while using read_csv()
Read_csv() is a function in pandas which is used to read a csv file in python. We can read a csv file by accessing it through a URL or even locally. While reading a csv file using read_csv, python can throw OSError : [errno22] invalid argument error.

Let us try to understand it with the help of an example. The below code has been executed in python shell to access local files. First, we shall import the pandas file to use read_csv()

import pandas as pd
file = read_csv(“C:\textfile.csv”)

The above line of code will raise the below error.

OSError: [Errno 22] Invalid argument: ‘C:\textfile.csv’
The reason behind the error is that python does not consider the backslash. Because of that, it showed oserror invalid argument. So what we have to do is that instead of a backslash, we have to replace it with a forwarding slash.

Correct method:
file = read_csv(“C:/textfile.csv”)

‘OSError : [errno22] invalid argument’ while using open()
We can get OSError : [errno22] invalid argument error while opening files with the open() function. The open() function in python is used for opening a file. It returns a file object. Thus, we can open the file in read, write, create or append mode.
Let us understand the error by taking an example. We shall try to open a .txt file in read mode using open(). The file would be returned as an object and saved in variable ‘f’.

f = open(“C:\textfile.txt”,”r”)

The code will throw the below error.

Traceback (most recent call last):
File “”, line 1, in
f = open(“C:\textfile.txt”,”r”)
OSError: [Errno 22] Invalid argument: ‘C:\textfile.

The OSError : [errno22] invalid argument error has been thrown because of the same reason as before. Here also, python fails to recognize the backslash symbol. On replacing backslash with forward slash, the error will be resolved.

Correct format:
f = open(“C:/textfile.txt”,”r”)

‘OSError : [errno22] invalid argument’ while reading image using open()
The above error can appear while opening an image using the open() function even though the backslash character has been replaced with forward slash. Let us see the error using an example.

image = open(“C:/image1.jpg”)

The error thrown would be:

Traceback (most recent call last):
File “”, line 1, in
image = open(“‪C:/image1.jpg”)
OSError: [Errno 22] Invalid argument: ‘\u202aC:/image1.jpg’

This error mainly occurs because of the copying of the file path. The Unicode characters also get copied sometimes when we copy the file path from our local system or the internet.

The Unicode character, ‘\u202a’ in the above example, is not visible in the file pathname. ‘\u202a’ is the Unicode control character from left to right embedding. So, it causes the above oserror invalid arguments.

The solution to this is straightforward. We simply have to type the URL manually instead of copying it. Thus, the Unicode character will no longer be in the URL and the error will be resolved.

What do you think? Please share in the comment section.

Installation of Anaconda for Python on Local Machine

Installing on Windows

  1. Download the installer:

  2. Verify your installer hashes.

  3. Double-click the .exe file.

  4. Follow the instructions on the screen.

    If you are unsure about any setting, accept the defaults. You can change them later.

    When installation is finished, from the Start menu, open the Anaconda Prompt.

  5. Test your installation. In your terminal window or Anaconda Prompt, run the command conda list. A list of installed packages appears if it has been installed correctly.

Installing in silent mode

Note

The following instructions are for Miniconda. For Anaconda, substitute Anaconda for Miniconda in all of the commands.

To run the the Windows installer for Miniconda in silent mode, use the /S argument. The following optional arguments are supported:

  • /InstallationType=[JustMe|AllUsers]—Default is JustMe.

  • /AddToPath=[0|1]—Default is 0

  • /RegisterPython=[0|1]—Make this the system’s default Python. 0 indicates JustMe, which is the default. 1 indicates AllUsers.

  • /S—Install in silent mode.

  • /D=<installation path>—Destination installation path. Must be the last argument. Do not wrap in quotation marks. Required if you use /S.

All arguments are case-sensitive.

EXAMPLE: The following command installs Miniconda for the current user without registering Python as the system’s default:

start /wait "" Miniconda3-latest-Windows-x86_64.exe /InstallationType=JustMe /RegisterPython=0 /S /D=%UserProfile%\Miniconda3

Updating conda

  1. Open your Anaconda Prompt from the start menu.

  2. Navigate to the anaconda directory.

  3. Run conda update conda.

Uninstalling conda

  1. In the Windows Control Panel, click Add or Remove Program.

  2. Select Python X.X (Miniconda), where X.X is your version of Python.

  3. Click Remove Program.


Information is shared here from the official Anaconda website: 
https://docs.conda.io/projects/conda/en/latest/user-guide/install/windows.html
Refer this website to install on Linus, Mac etc
How to get date and time in Python

Python has a module called as datetime which gives the current date and time in Python. Datetime module comes with pre-built so we dont have to install it explicitly but we do need to import the module. datetime module provide some functions to get the current date as well as time. You can get complete information from the document website here. In this article, we will look at the some of the important functions and implement with examples. Let’s look at them.

date.today():
today() method of date class under datetime module returns a date object which contains the value of Today’s date.

Syntax: date.today()
Returns: Return the current local date.

Implementation of datetime

# Import the module datetime
import datetime as dt

# Returns the current local date using class date
today_date = dt.date.today()
print("Today's date: ", today_date)
# We can extract date, month and year separately too
print("Today's date: ", today_date.day,"-",today_date.month,"-",today_date.year)

To know what is inside datetime, we can use dir() function to get a list containing all attributes of a module.

import datetime
print(dir(datetime))

Output:

['MAXYEAR', 'MINYEAR', 'builtins', 'cached', 'doc', 'file', 'loader', 'name', 'package', 'spec', 'date', 'datetime', 'datetime_CAPI', 'sys', 'time', 'timedelta', 'timezone', 'tzinfo']

We have already seen the date class. Other commonly used classes are: time, datetime, timedelta

We can create object of Time class to represent time. example:

from datetime import time
import datetime as dt
from time import strftime

current_time = dt.datetime.now()
print("current_time =", current_time.time())
#change the format
print(dt.datetime.now().strftime('%Y-%m-%d %H:%M:%S'))

# time(hour, minute and second)
time1 = time(11, 34, 56)
print("Given time =", time1)

time2 = time(hour = 11, minute = 34, second = 56)
print("Given time =", time2)

# time(hour, minute, second, microsecond)
time3 = time(11, 34, 56, 234566)
print("Given time =", time3)
How classes and objects are used in Python

Python is said to be a pure object oriented programming language and almost everything you come across in Python is an object. A class can be defined as a user-defined type that, by having its own methods (functions) and property (variables), define what object will look like. An object is a single instance of a class. You can create many objects from the same class type.

Creating a class in Python
class keyword is used in Python to create a class, an example is shown below. We create a class named Books with a property named total_count:

class Books:
total_count = 5

Creating an object
class is just a blueprint. In order to use the class, we need to create an object. In below example, lets create an object called learn_python and using this we will print the value of total_count:

class Books:
total_count = 5
python_book = Books()
print(python_book.total_count)

The init() Function
Let’s look at an important member of the class. We are talking about init() function. Infact all classes have this function, which is always called an object of the class in being created. This function is called automatically so you dont have to specifically call this. We use the init() function to initialize values or properties that needs to be assigned to the object immediately when created. In the below example, we create a class Books and using the init() function, we have automatically assigning title and the cost to the object:

class Books:
def __init__(self, title, cost):
self.title = title
self.cost = cost

python_book = Books("Learn and Practice Python Programming", 136)
print(python_book.title)
print(python_book.cost)

Object Functions
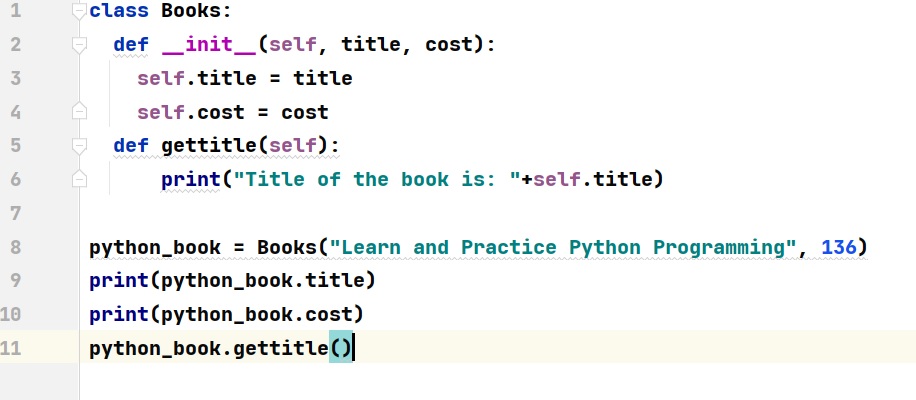
A class will also have object functions or methods. Functions that are defined in objects, belong to object (and not to the class). It means that the objects will use these functions and the result returned will be specific to the objects. These are characterised by self keyword as first parameter being passed. Let’s add a function to our class Books which will print the title of the book. This is called object function because it knows which objects are referencing and the title value is linked to that object only.
Example:

class Books:
def __init__(self, title, cost):
self.title = title
self.cost = cost
def gettitle(self):
print("Title of the book is: "+self.title)

python_book = Books("Learn and Practice Python Programming", 136)
print(python_book.title)
print(python_book.cost)
python_book.gettitle()

The self parameter used in object functions is to show the reference to the current object associated to the class.
Please note, it does not have to be named self, we can use any name we like it but whatever name we choose, that has to be the first parameter of the object functions.

We will end our discussion here. We will develop a mini application using classes in next article.

Python 3.10 – what can we expect from it?

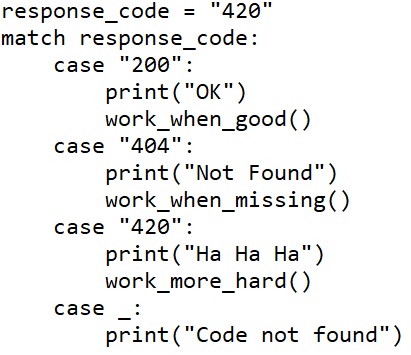
Image above shows how CASE statement can be implemented in Python, wait you cant make it work today but surely can after 4th October, that is after Python 3.10 is made available for all of us. In the 3.10 version, we will see some of the most fascinating features like structural pattern matching, parenthesized context managers, more typing, and improved error messages to make our life easier.

In 2020, Guido van Rossum, the creator of Python, committed the first documentation showing the new switch-statements, which have been named Structural Pattern Matching. Python is not using the switch keyword for its Structural Pattern Matching as other programming languages do, instead, it will be using match keywords. So it might be possible that we would refer to it as a Python match case statement instead of a Python switch case.

The new structural pattern matching will help us to match variables against one or even one of a set of possible values. This will no doubt be very powerful feature and will make it possible to write code for a variety of scenarios. One example is offcourse the code added as an image above. Lets look at another example:

Let’s try to use match case Statement and implement the weekday calculator as example:

def weekday(day):
    match day:
        case 1:
            return "Sunday"
        case 2:
            return "Monday"
        case 3:
            return "Tuesday"
        case 4:
            return "Wednesday"
        case 5:
            return "Thursday"
        case 6:
            return "Friday"
        case 7:
            return "Saturday"
        #wildcard case
         case _:
            return "Please Enter a Valid Day Number"

 print(weekday(1))   #Sunday
 print(weekday(4))  #Wednesday
 print(weekday(7))  #Saturday
 print(weekday(11)) #Please Enter a Valid Day Number

Impressed? There is more to come. Using, what is called as structural pattern matching, we can perform the same match-case logic even based on whether the structure of our comparison object matches a given pattern.

To demonstrate, lets take two dictionaries:

dict_a = {
    'id': 1,
    'meta': {
        'source': 'abc',
        'location': 'west'
    }
}

dict_b = {
    'id': 2,
    'source': 'def',
    'location': 'west'
}

 We could write a pattern to match dict_a like:

{
    'id': int,
    'meta': {'source': str,
             'location': str}
}

A pattern to match dict_b like:

 {    'id': int,
    'source': str,
    'location': str
}

We can now put both of these together in a match-case statement:

# loop through both dictionaries and a 'test'
for d in [dict_a, dict_b, 'test']:
   match d:
       case {'id': ident,
             'meta': {'source': source,
                      'location': loc}}:
           print(ident, source, loc)
       case {'id': ident,
             'source': source,
             'location': loc}:
           print(ident, source, loc)
       case _:
           print('no match')

Watch out for my next few articles in which I will cover:

  • Parenthesized context managers
  • More Python typing features
  • Display better error messages

Stay tuned. Do comment here if you liked this article.